In this recipe
- Why this storage tip is great
- The Best Way to Store Baked Potatoes
- How to Reheat Leftover Potatoes to Make Them Extra Crispy and Creamy
- How to Freeze for Longer Storage
- Baked Potatoes & Storage Tips That Worked (and Didn’t)
- More Delicious Potato Recipes
- Frequently Asked Questions
Estimated reading time: 13 minutes
Why this storage tip is great
We tested every possible way to store and reheat baked potatoes—with and without toppings—using different storage methods and packaging. After trying it all, we found the best method.
Follow our step-by-step instructions to store and reheat baked potatoes the right way and keep them fresh. Plus, get tips for reheating leftovers to bring back that perfect crispy and creamy texture!
Want to reheat baked potatoes? Jump here. Want to store them? Jump here.

The Best Way to Store Baked Potatoes
Have you ever struggled to keep leftover baked potatoes crispy, soft, and just as tasty as when they first came out of the oven? We tested all the best ways to store baked potatoes and found the one that really works. After reheating, your potatoes will still be fresh, soft, and creamy!
Let’s be honest: when you bake potatoes, you always want to bake a bunch. It saves so much time and energy. Here’s how you can store baked potatoes and reheat them so they stay crispy and soft—even the next day. This is perfect for meal prep during the week and can save you hours when you need a quick dinner.
How to store baked potatoes?
There are two ways to do it. The first way is when you store potatoes without any fillings—just plain baked potatoes. The second method (and honestly, the one you’ll love most) is storing baked potatoes with fillings—butter and cheese inside. When you’re ready to serve, just reheat them and add your favorite toppings.
Let’s look at the first method.
How to store plain baked potatoes (without filling)?
- Let the potatoes cool down at room temperature.
- Place them in an airtight container and put them in the fridge.
- Store for up to 5 days.
Now, there’s another way to store baked potatoes—and it’s way better. We tested a lot of methods, and this one came out the tastiest and creamiest! You bake the potatoes first, add the butter and cheese fillings, and then store them in the fridge. When you’re ready to eat, just reheat and add your favorite toppings. It’s so delicious that once you try it, you’ll never want baked potatoes any other way.
So, how do you store baked potatoes with fillings?
Let’s talk about the ingredients and equipment you need.
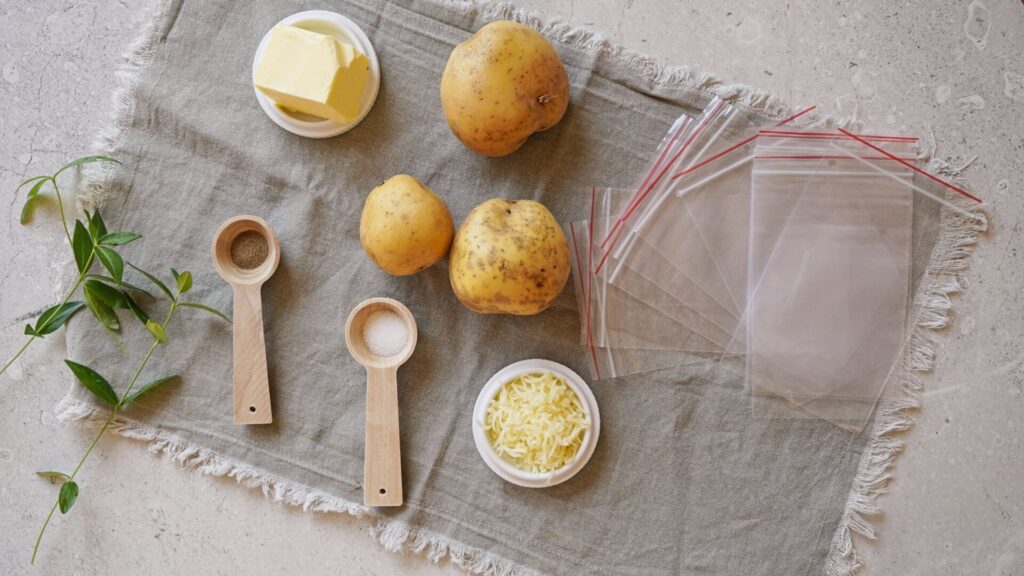
Equipment:
- Ziploc bags
- Container
Ingredients:
- Potatoes
- Butter
- Mozzarella cheese
- Olive oil
- Salt and pepper
Choose the Right Potatoes
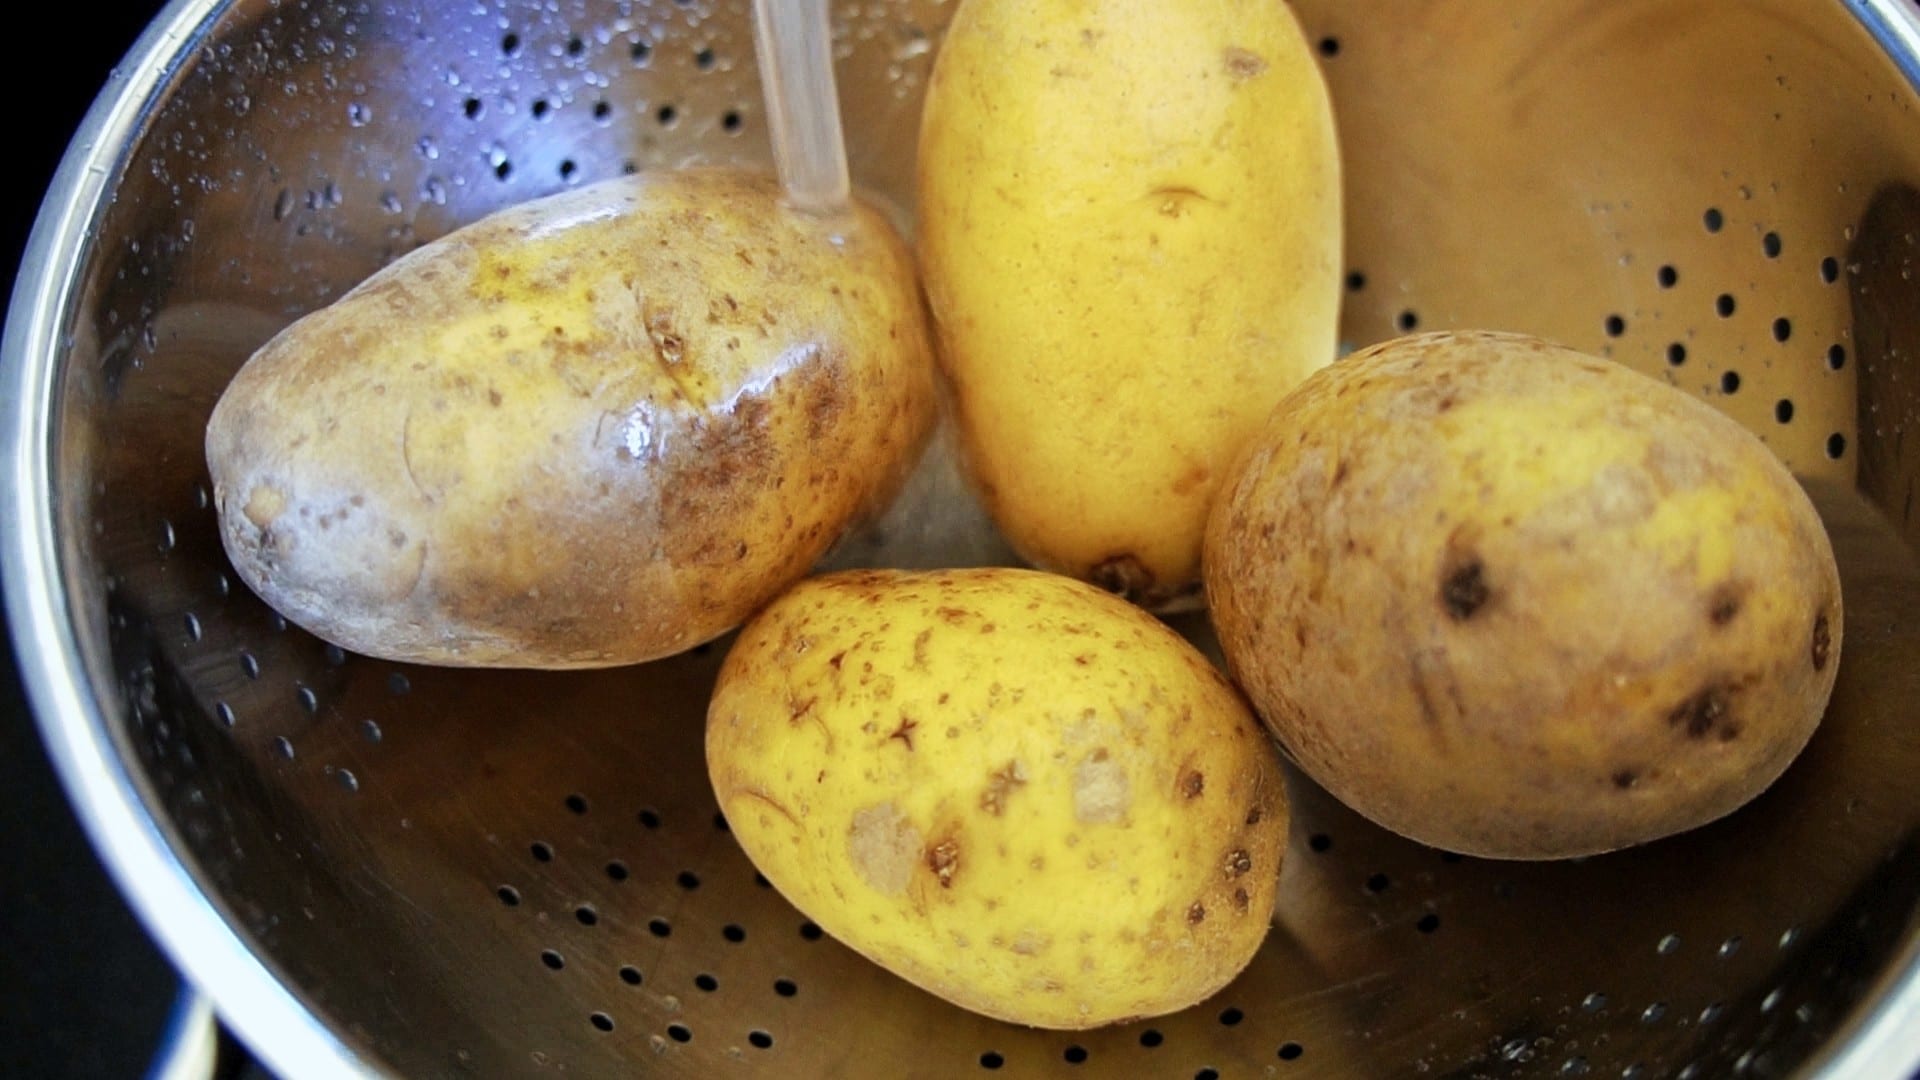
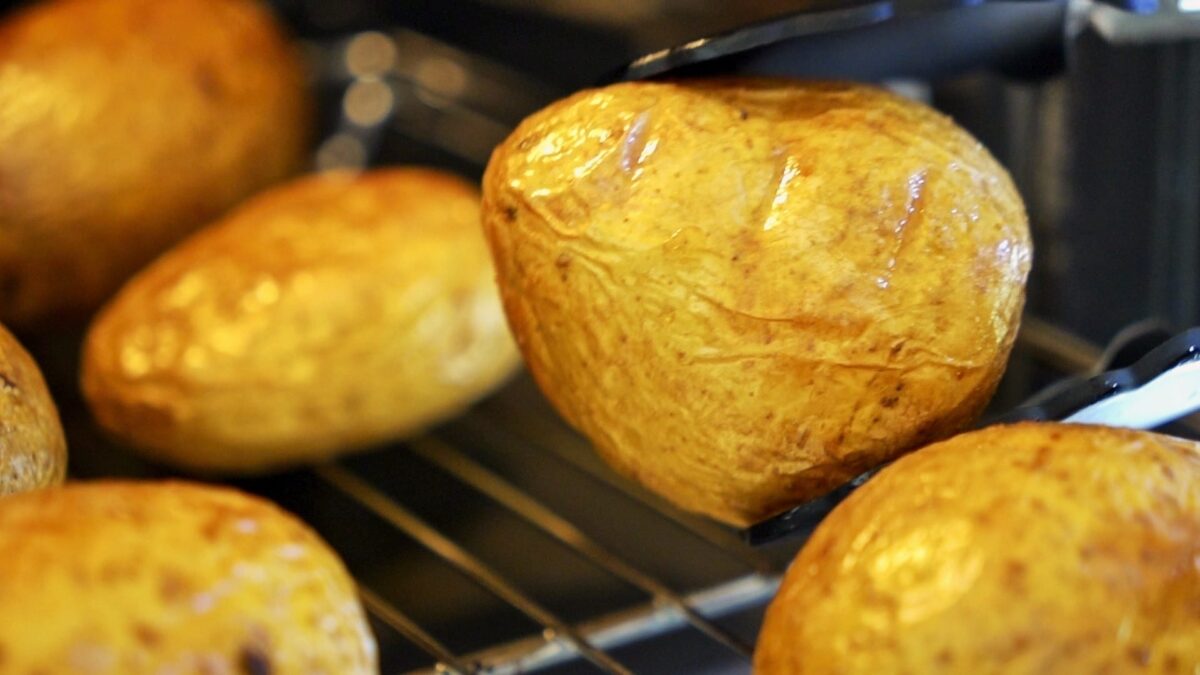
First, choose big, long potatoes. These are perfect for baking. They’re big enough to be fluffy inside, and you can load them with many delicious toppings. Wash potatoes in cold water and dry.
Prepare and Bake the Potatoes
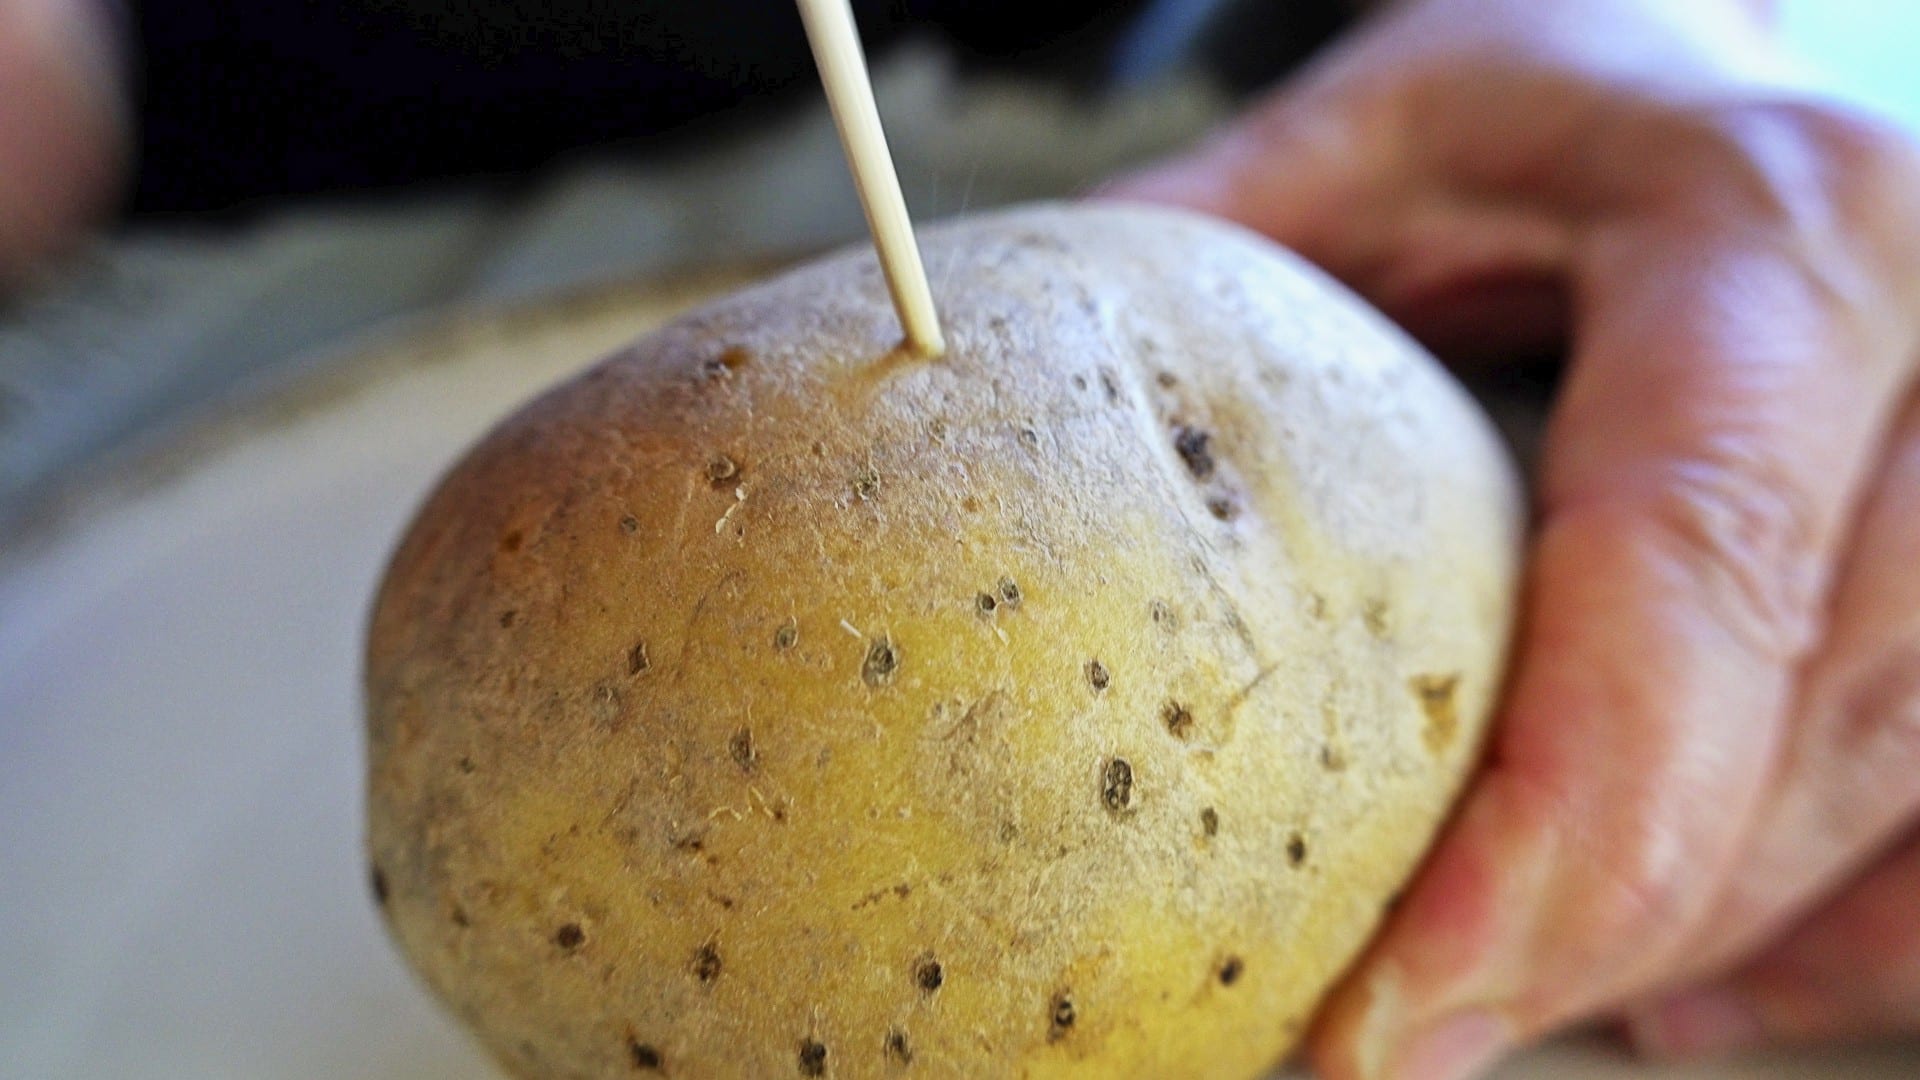
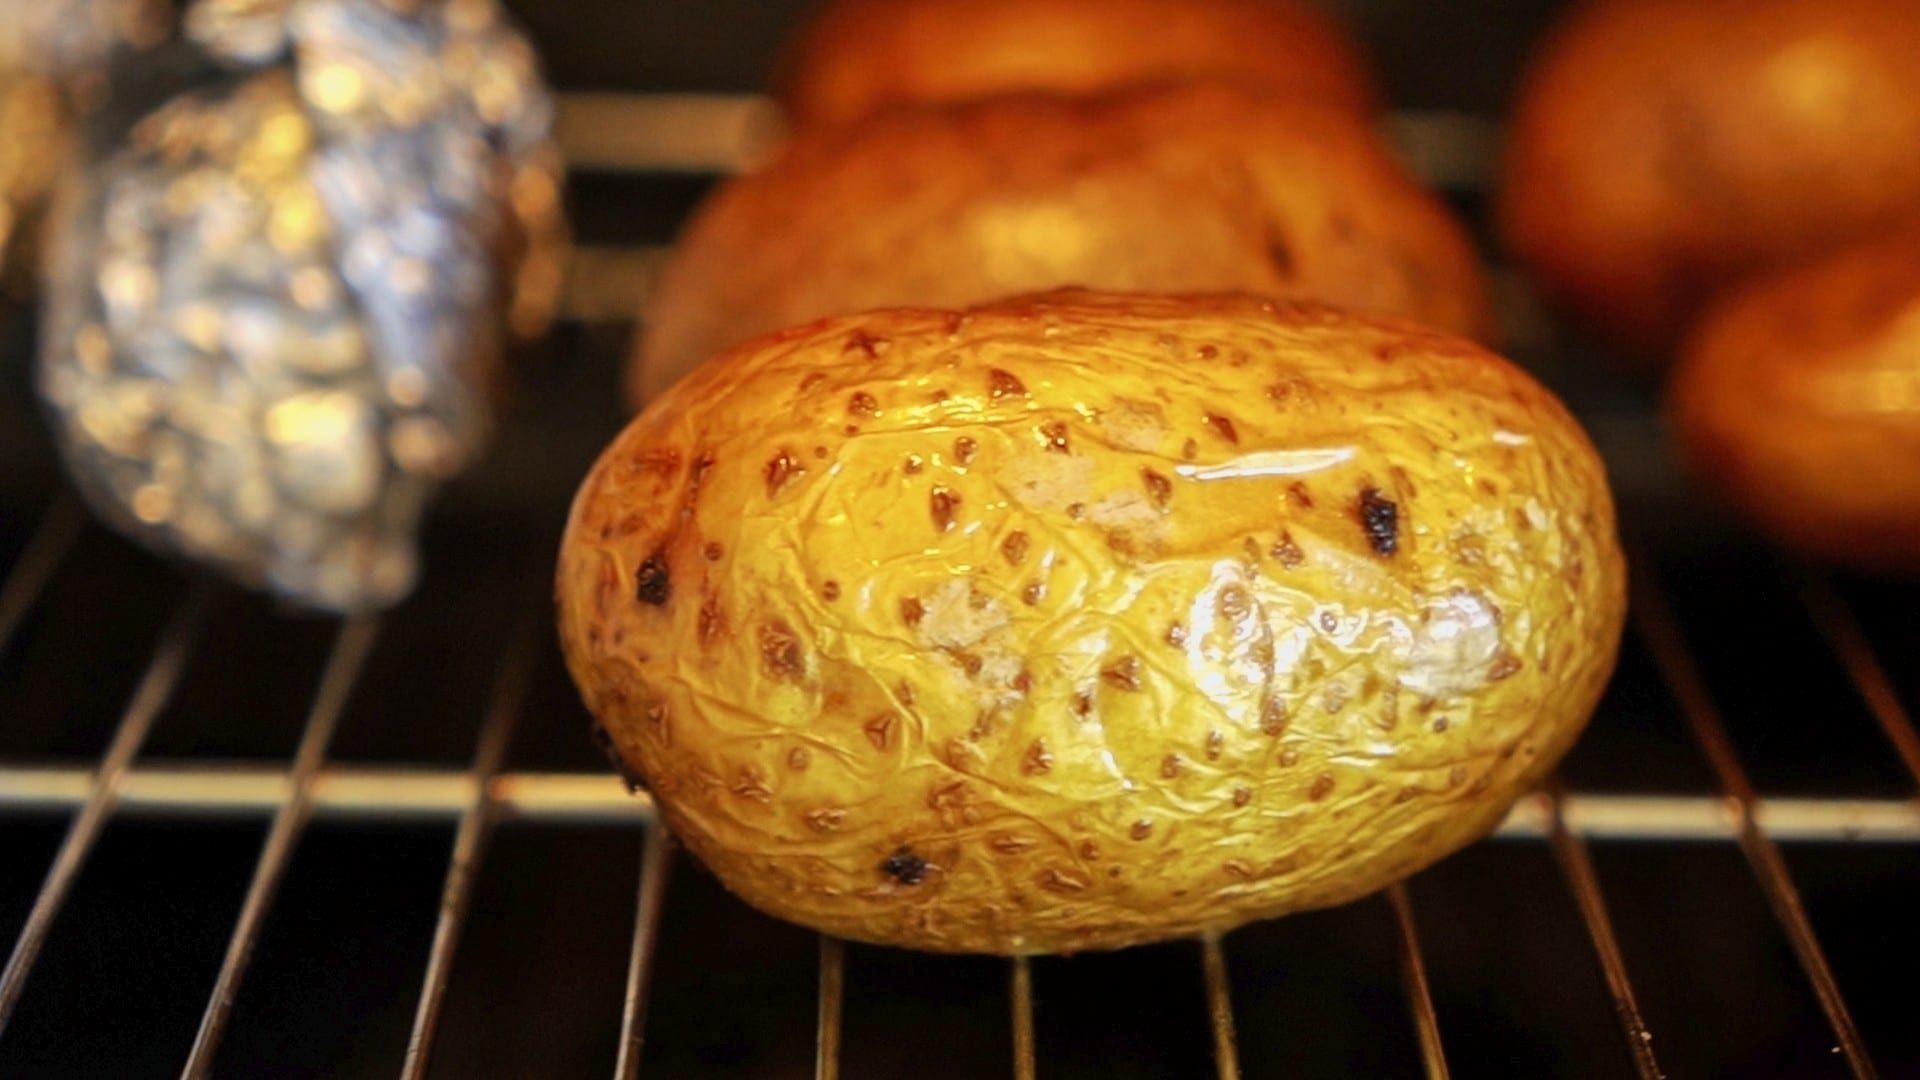
Preheat your oven. Pierce the potatoes with a skewer, fork, or toothpick. Brush them with olive oil. Place the potatoes on a rack in the lower part of the oven. Bake until they are soft. The baking time depends on the size and type of potato. It usually takes between 60 and 90 minutes.


Mash and Season the Potatoes
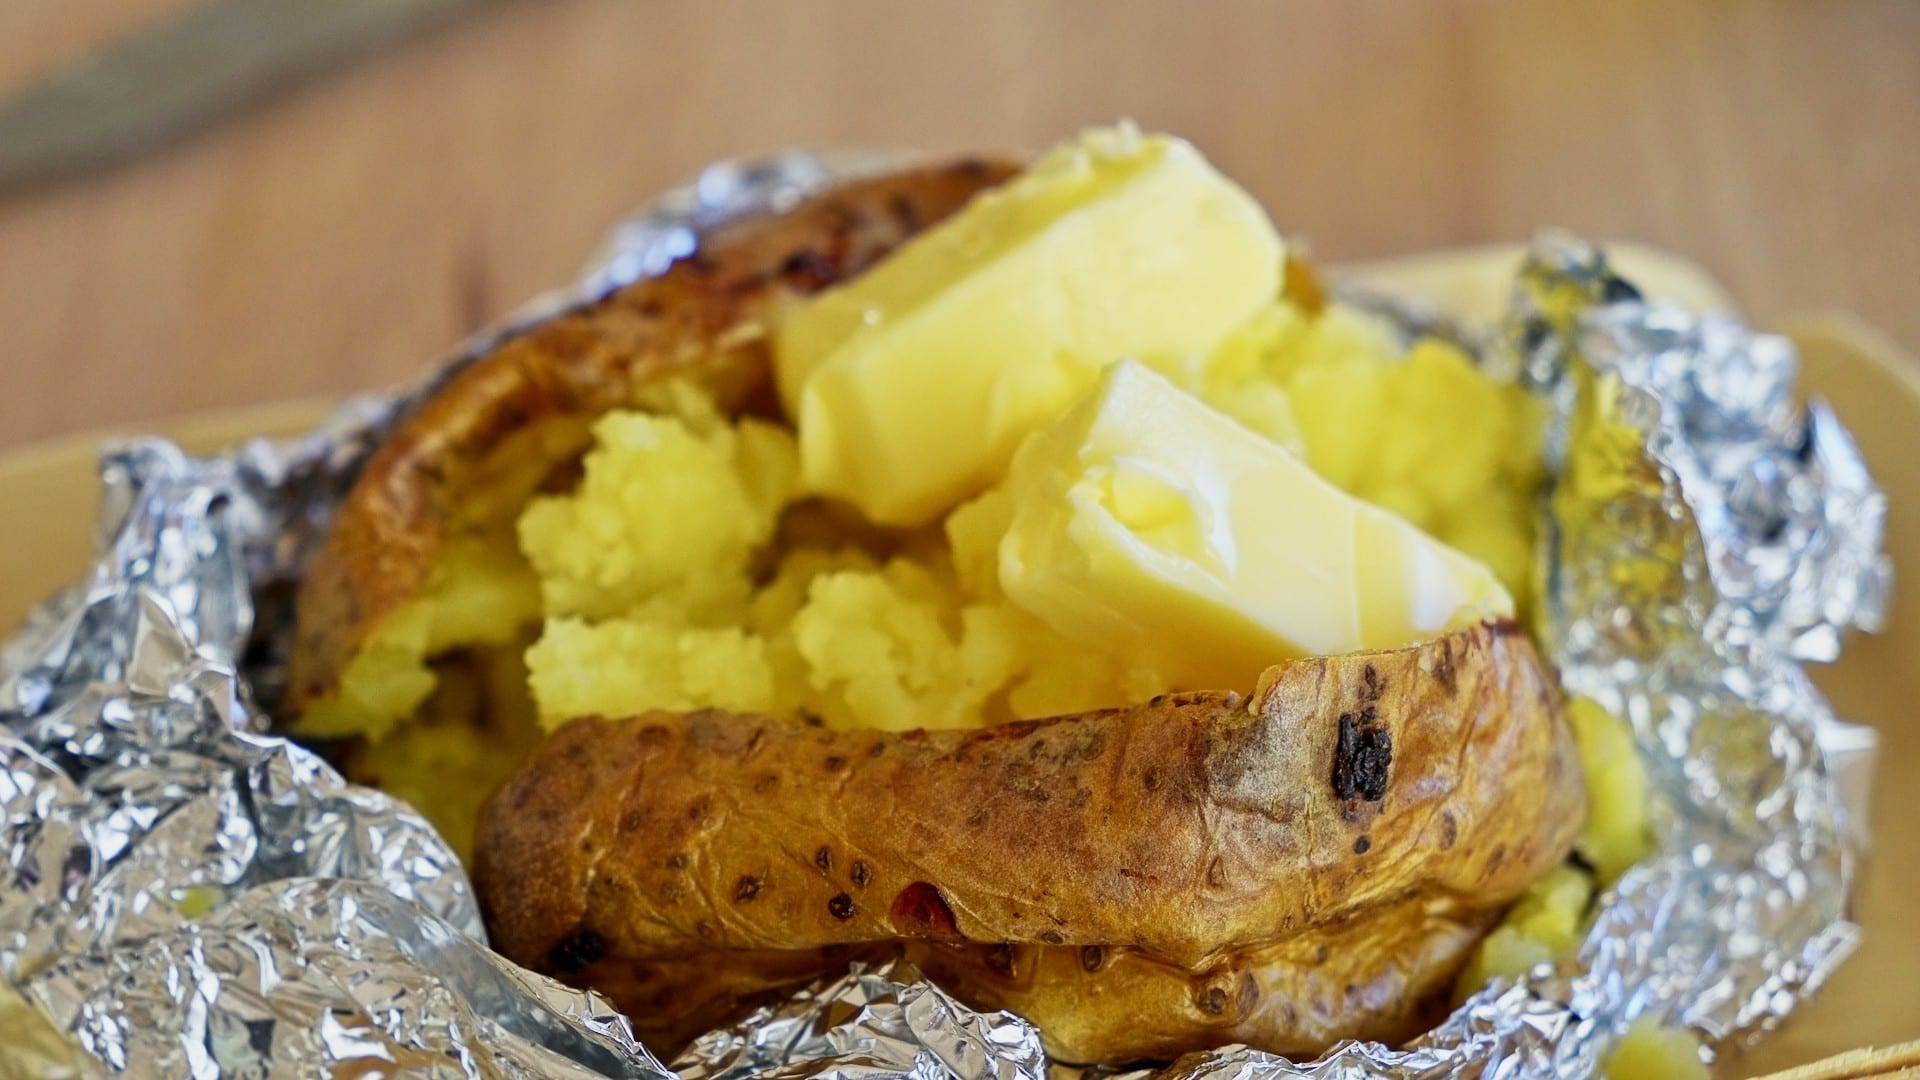
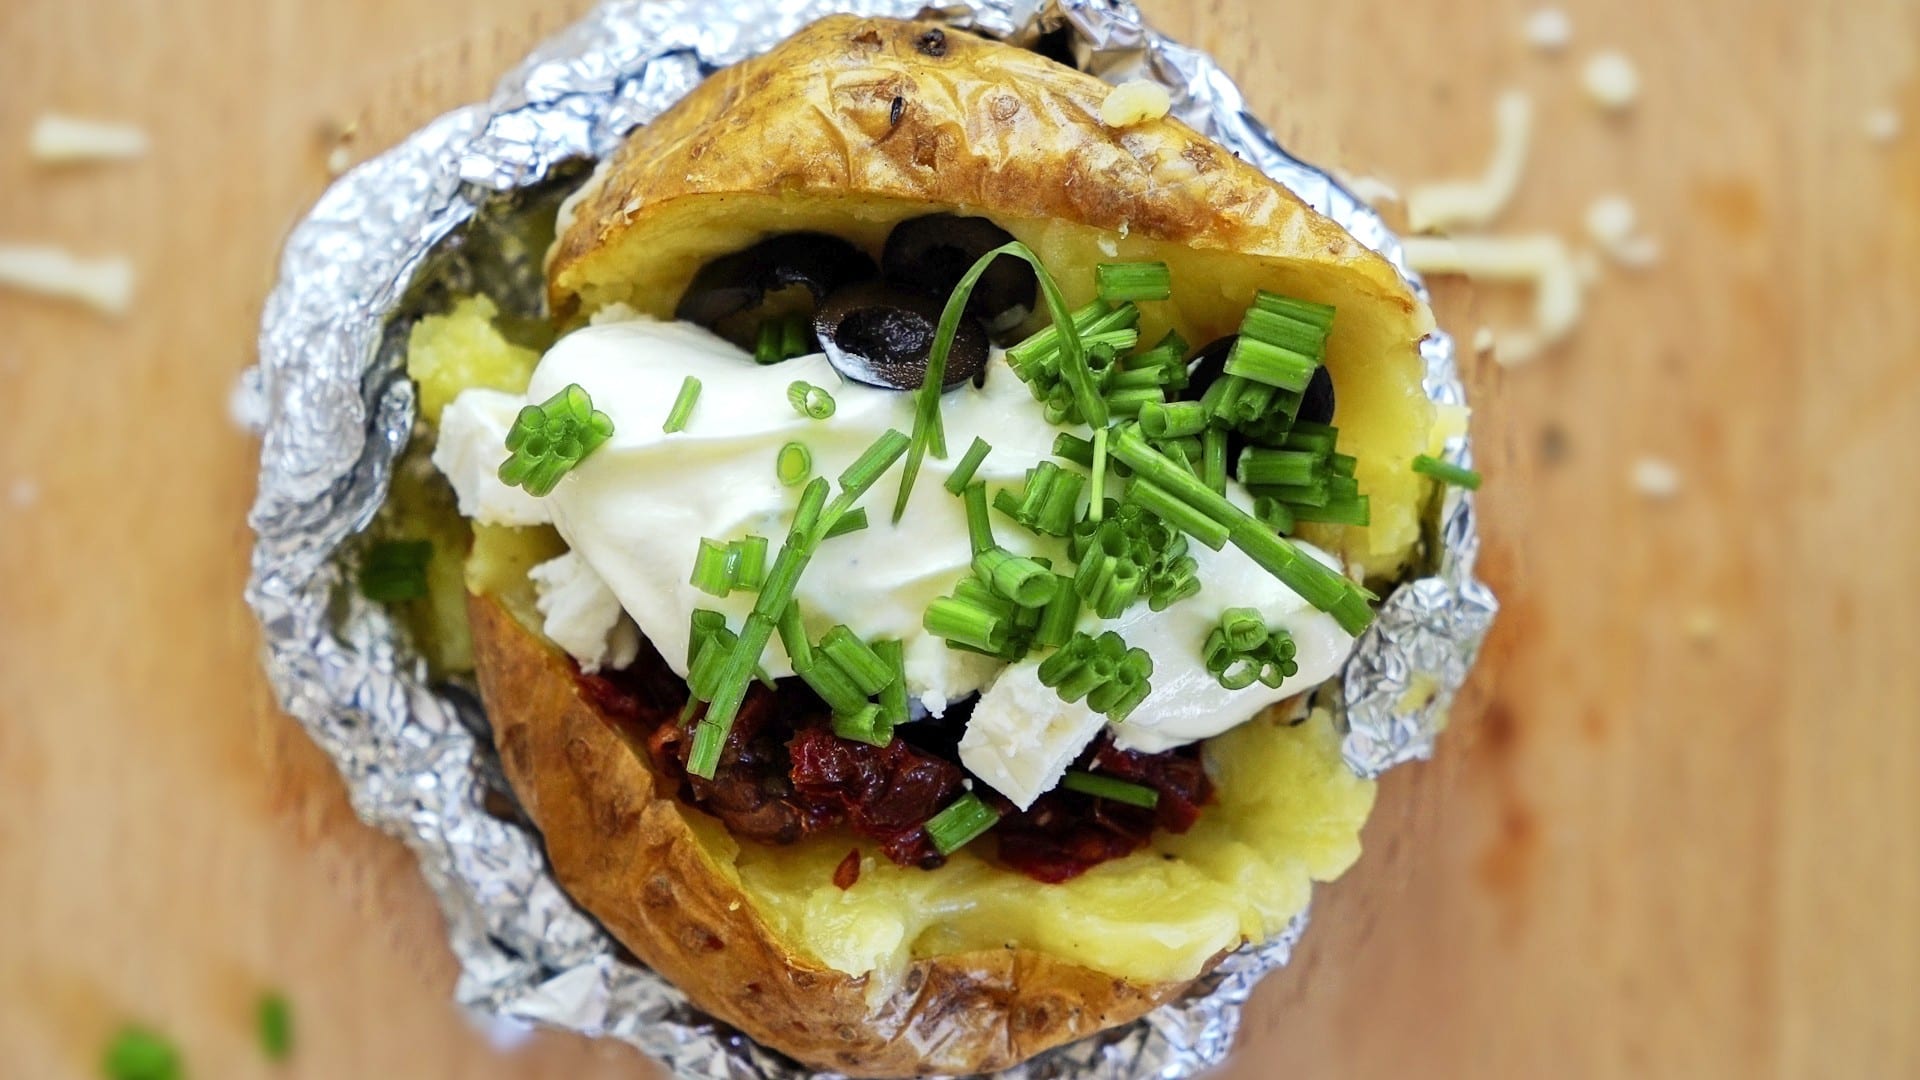
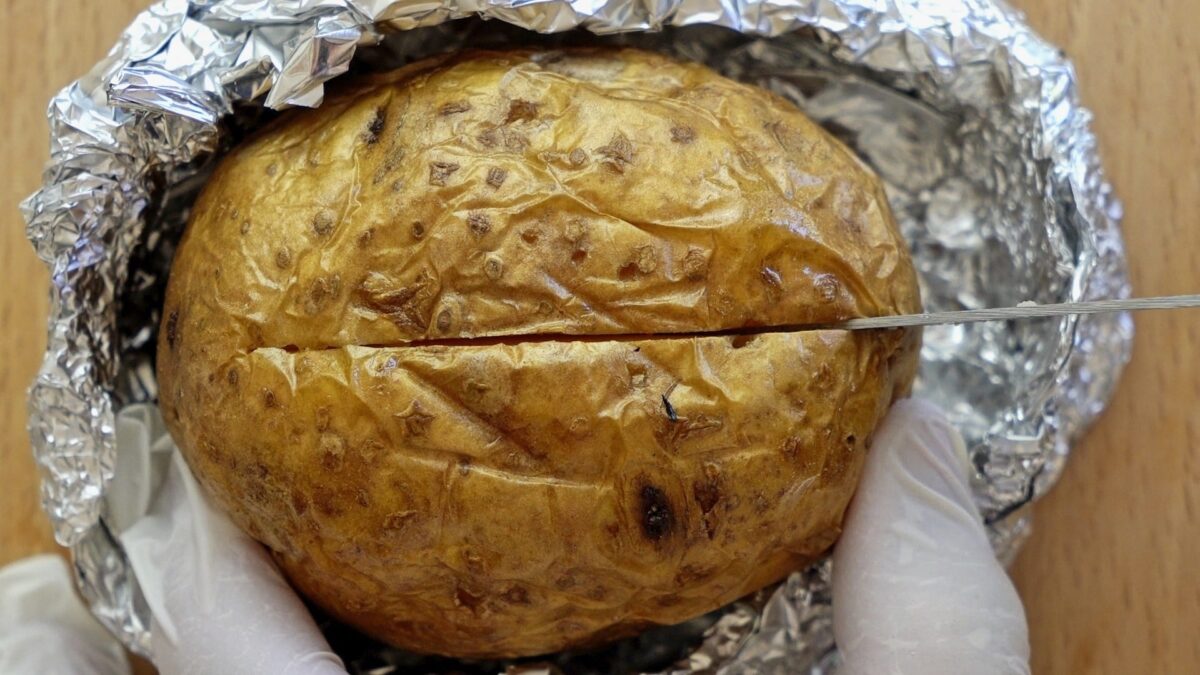
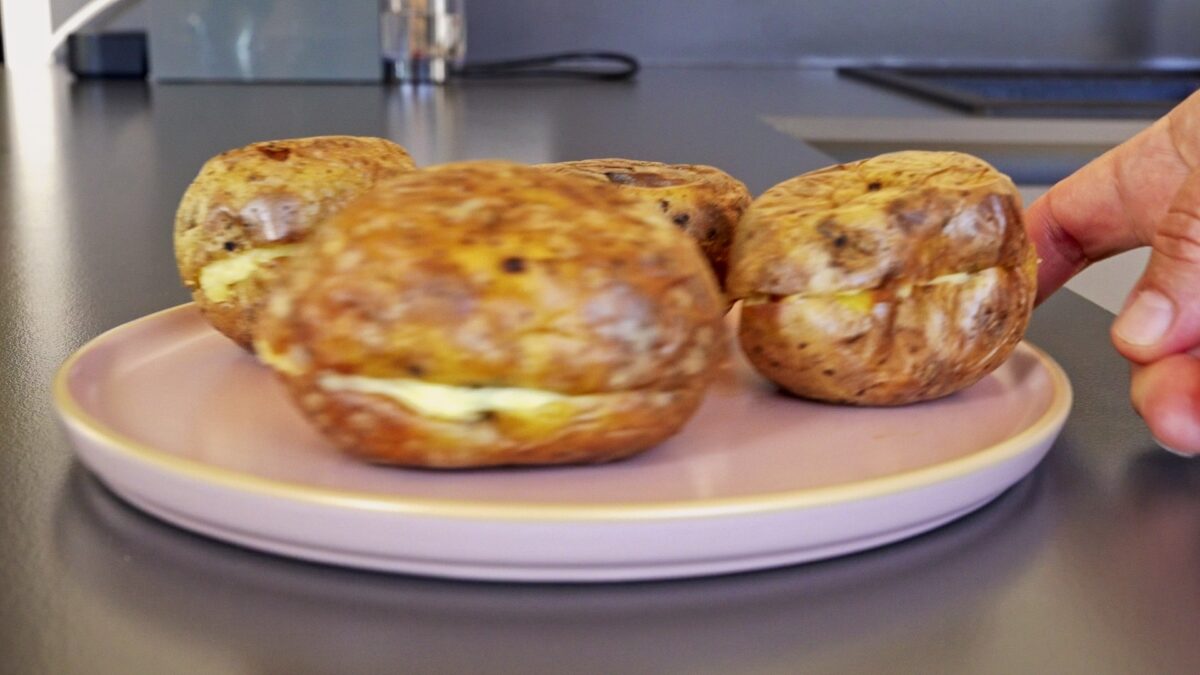
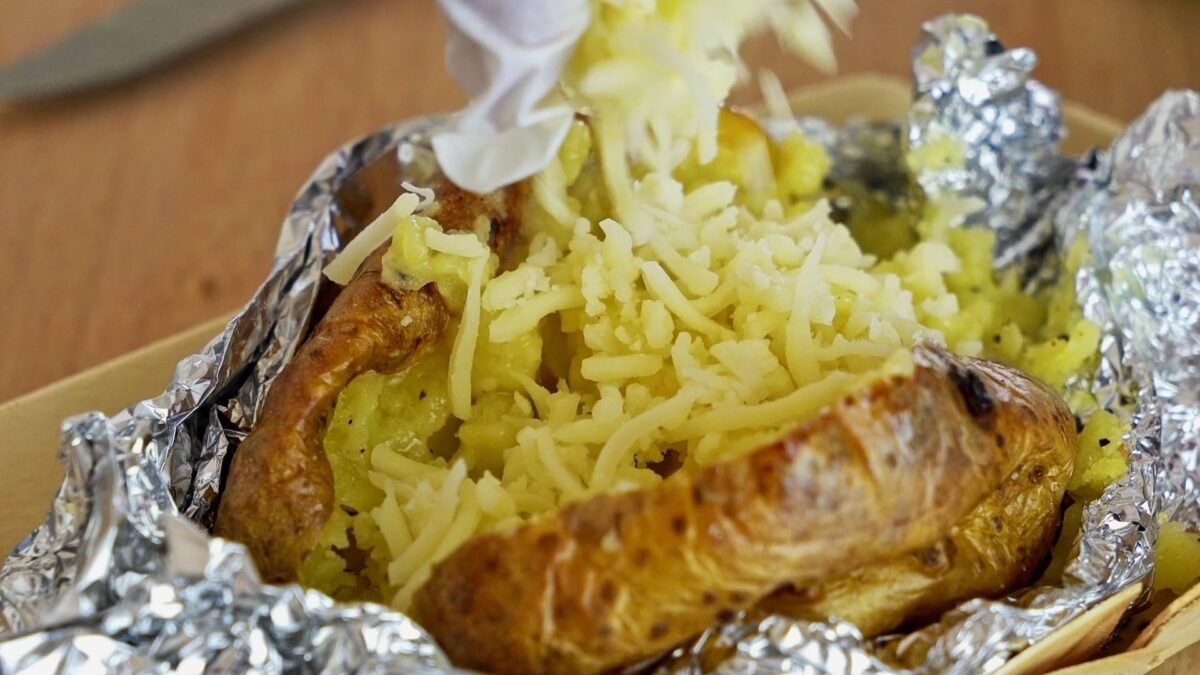
Remove the potatoes from the oven. Place them in a small dish or make a simple holder out of aluminum foil. While they’re still hot, cut the top of each potato. Gently mash the insides with a fork, but keep the skins intact.
Add butter to each potato and stir until smooth. Season with salt and pepper. Then mix in the grated cheese and mash everything well. For exact amounts of butter and cheese, check the recipe card below.


Cool and Store the Potatoes
Join the potato halves together. Let the potatoes cool at room temperature.
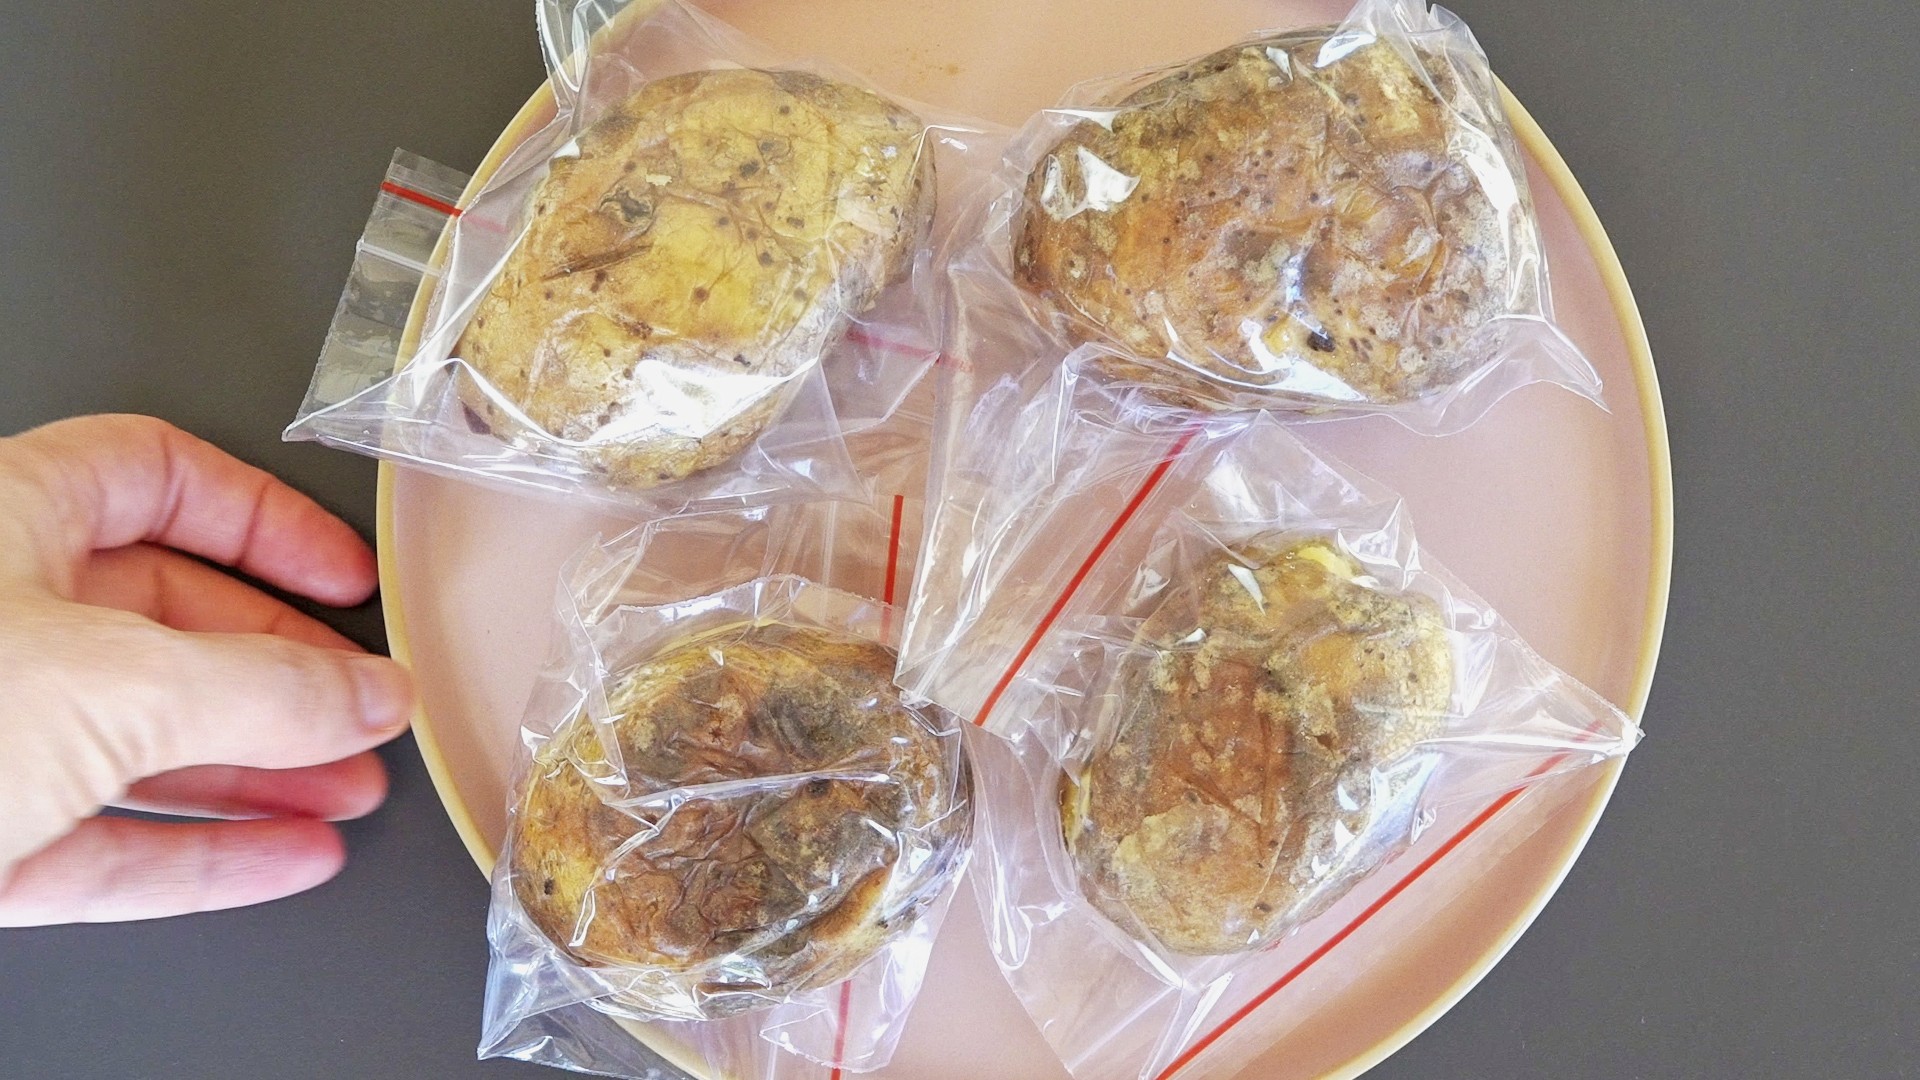
Put the potatoes in resealable plastic bags or Ziploc bags. If you want to know how to get the air out of a Ziploc bag, check out our quick hack below.

Tip: Place the bags in an airtight container to help the potatoes keep their shape during storage. Store them in the fridge. This creates the best conditions to prevent bacterial growth. When you store them this way, you won’t see signs of spoilage, and the potatoes stay safe to eat for up to 3 days.
Quick Hack to Squeeze Air Out of a Ziploc Bag
We’re sharing a hack for squeezing out all the air from a Ziploc bag when packing something. All you need is a Ziploc bag and a straw.
- Put a potato into the bag. One potato per bag works great for a single serving.
- Place the straw in one corner of the bag. Seal the Ziploc on the other side and leave the straw in so air can only escape through it.
- Now, exhale fully through your mouth, then quickly inhale through the straw. Remove the straw and seal the bag tightly.
It’s a simple hack, but it helps keep your packed items air-free and easy to store. Give it a try!
How to Reheat Leftover Potatoes to Make Them Extra Crispy and Creamy
You can reheat baked potatoes in the oven, a pan, or the microwave. All these methods work for plain baked potatoes without fillings, and for baked potatoes with fillings, like we made above. We prefer oven-reheated potatoes with fillings because they turn out creamy inside with a crispy skin.
How to Reheat Baked Potatoes in the Oven
- Take the potatoes out of the fridge.
Remove them from the bag or container they were stored in. - Preheat the oven.
Set it to 180°C (350°F). - Get the potatoes ready.
Don’t split them open. You can place the potatoes on a baking sheet or put them directly on the oven rack to heat evenly. - Bake until heated through.
Reheat the potatoes for 20–30 minutes, depending on their size. - Enjoy!
Add your favorite toppings. The skins will get crispy, and the inside will stay soft and creamy—just like when they were freshly baked!
How to Reheat Baked Potatoes in the Microwave
- Place the potato on a microwave-safe plate.
- Heat on full power for 2–3 minutes.
- Check after 1 minute.
Every microwave is a little different, so check to see how it’s warming.
Important: The skin won’t get crispy in the microwave. If you want that crispy texture, it’s better to reheat the baked potato in the oven.
How to Reheat Baked Potatoes in a Pan
- Heat a pan over medium heat.
- Place the potato inside the pan.
- Cover with a lid.
This helps the potato heat evenly. - Cook for 5–7 minutes.
The time depends on the size of the potato. Heat until it’s warmed all the way through. - Flip once or twice.
Flip the potato during cooking to heat it evenly and get a little crisp on the outside if you like.
We love reheating baked potatoes in the oven. They turn out creamy, cheesy, and crispy on the outside. This is the best way to reheat baked potatoes — it’s quick, and the result is so good! When you bake raw potatoes, it usually takes 60 to 90 minutes to cook them all the way through. But when you’re reheating baked potato, you only need 30 minutes to get them hot and crispy again. That’s a big time-saver!

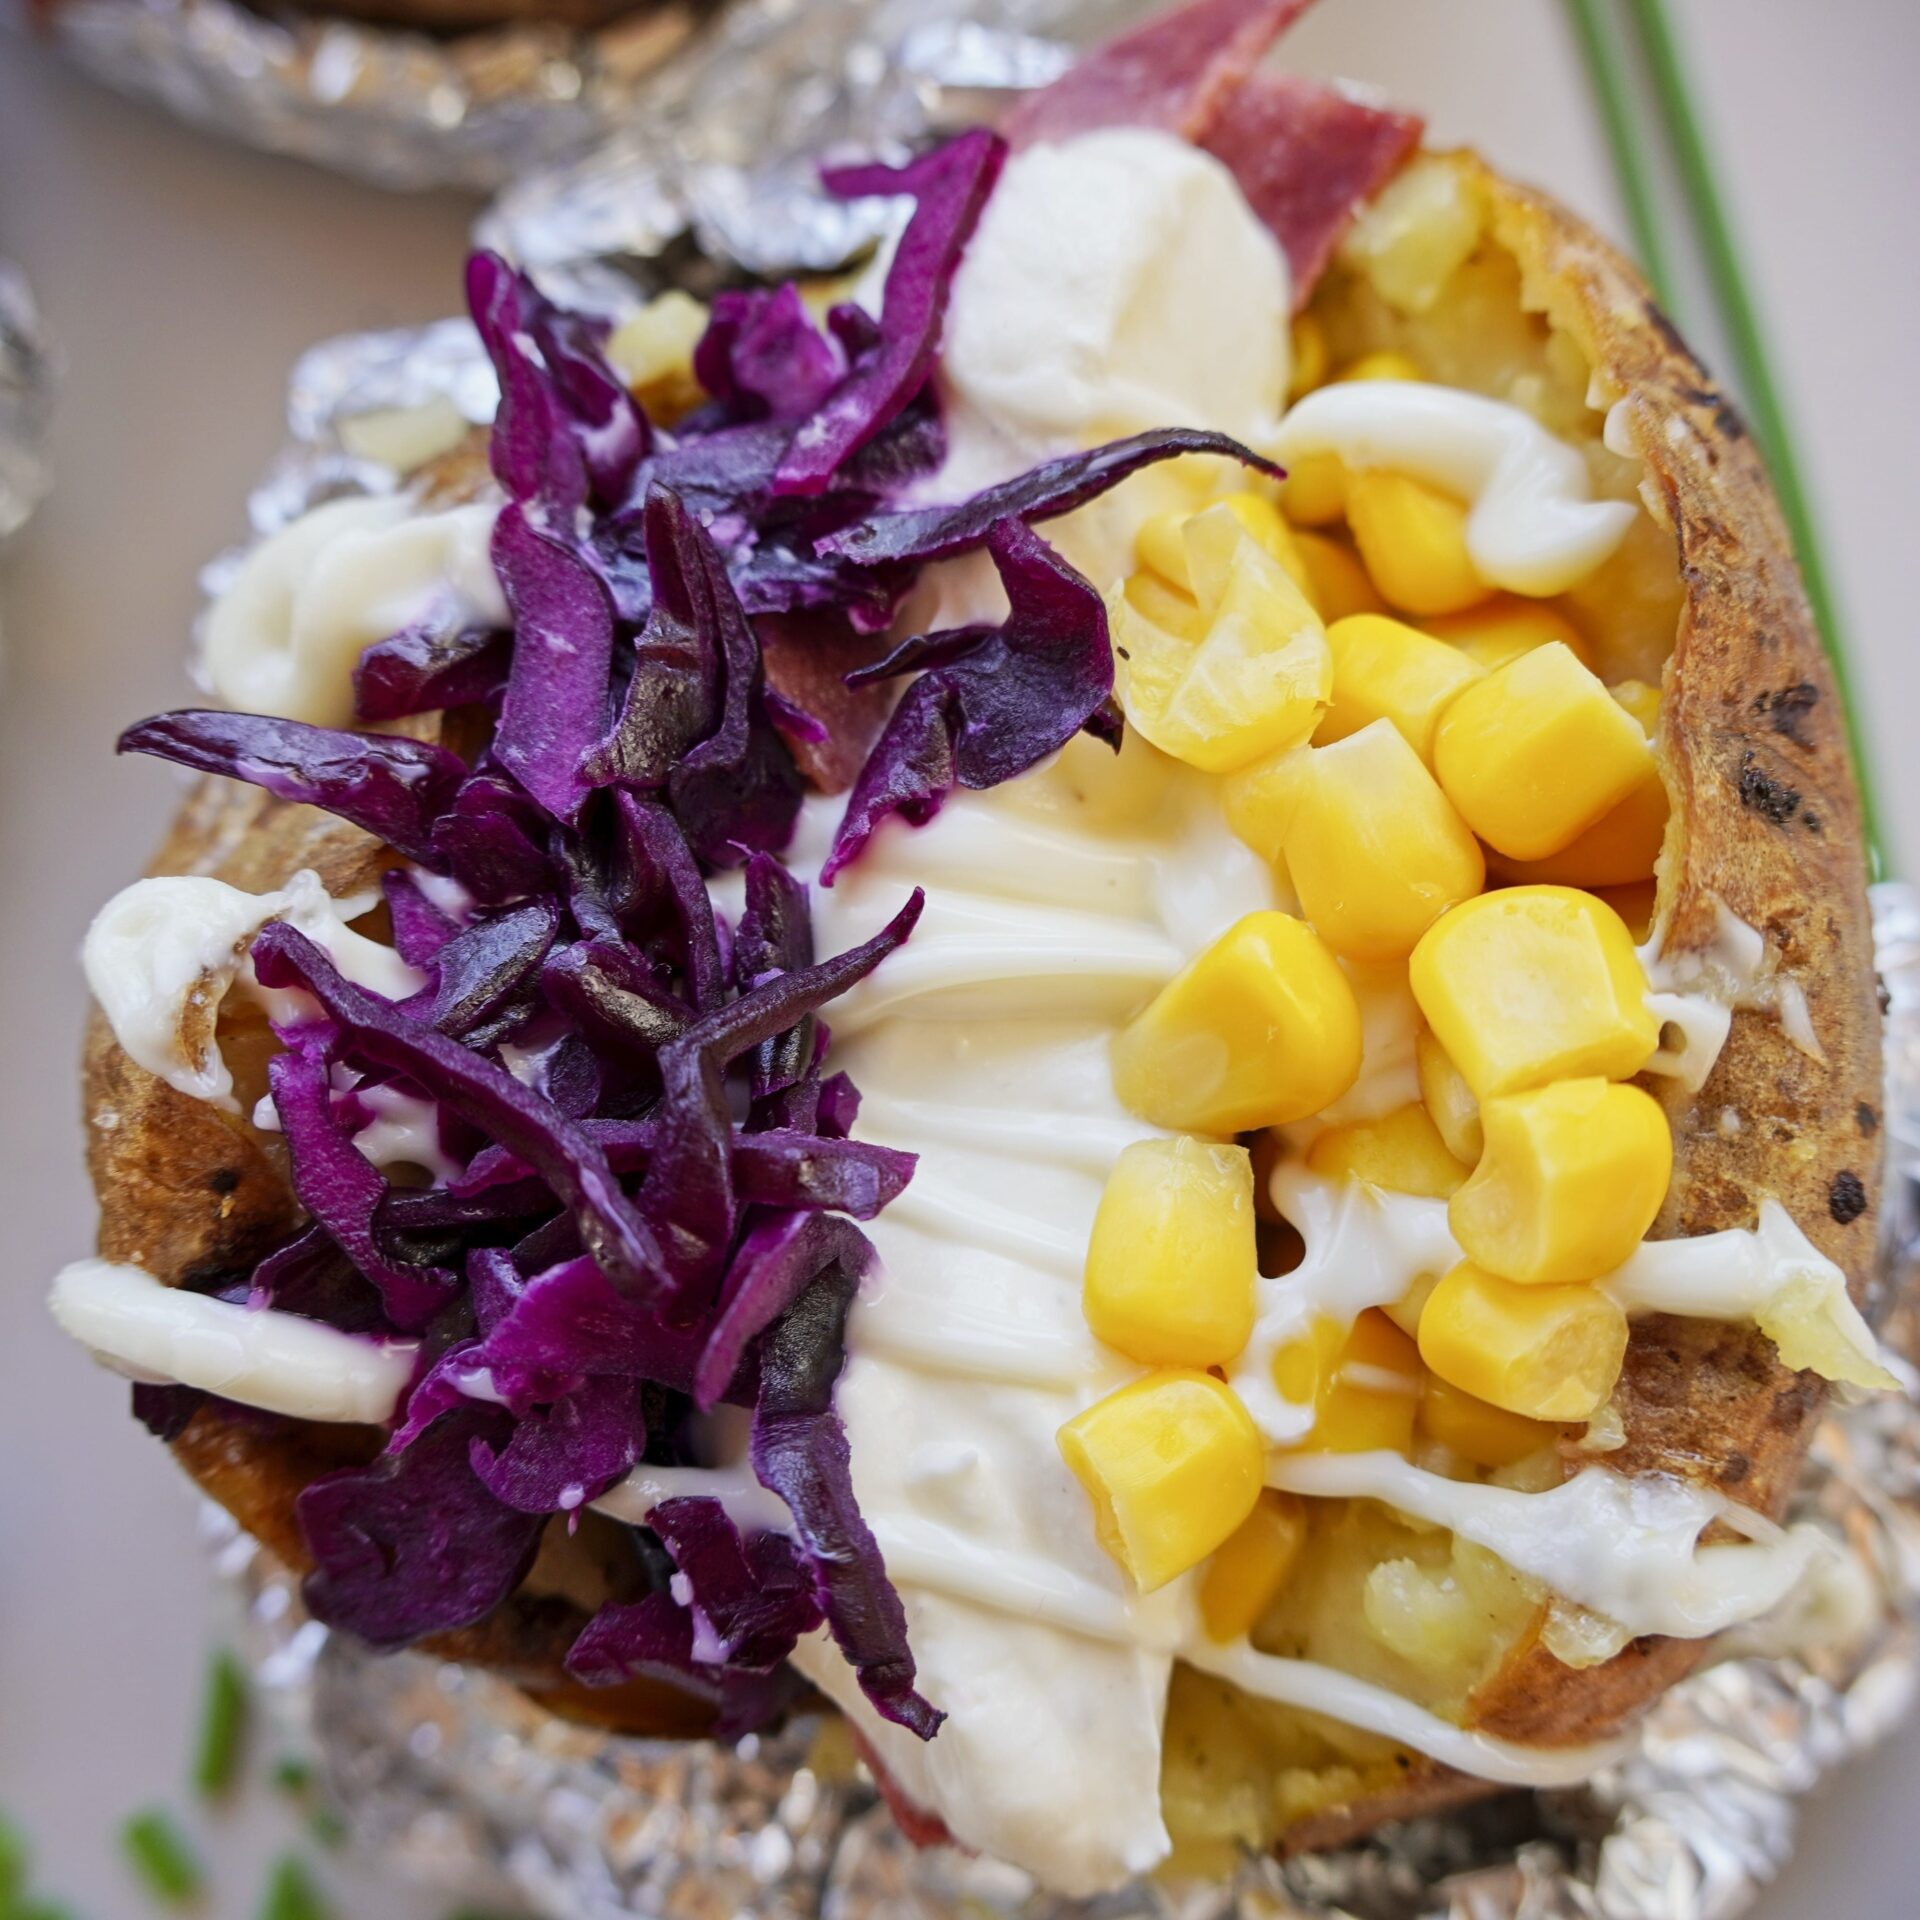
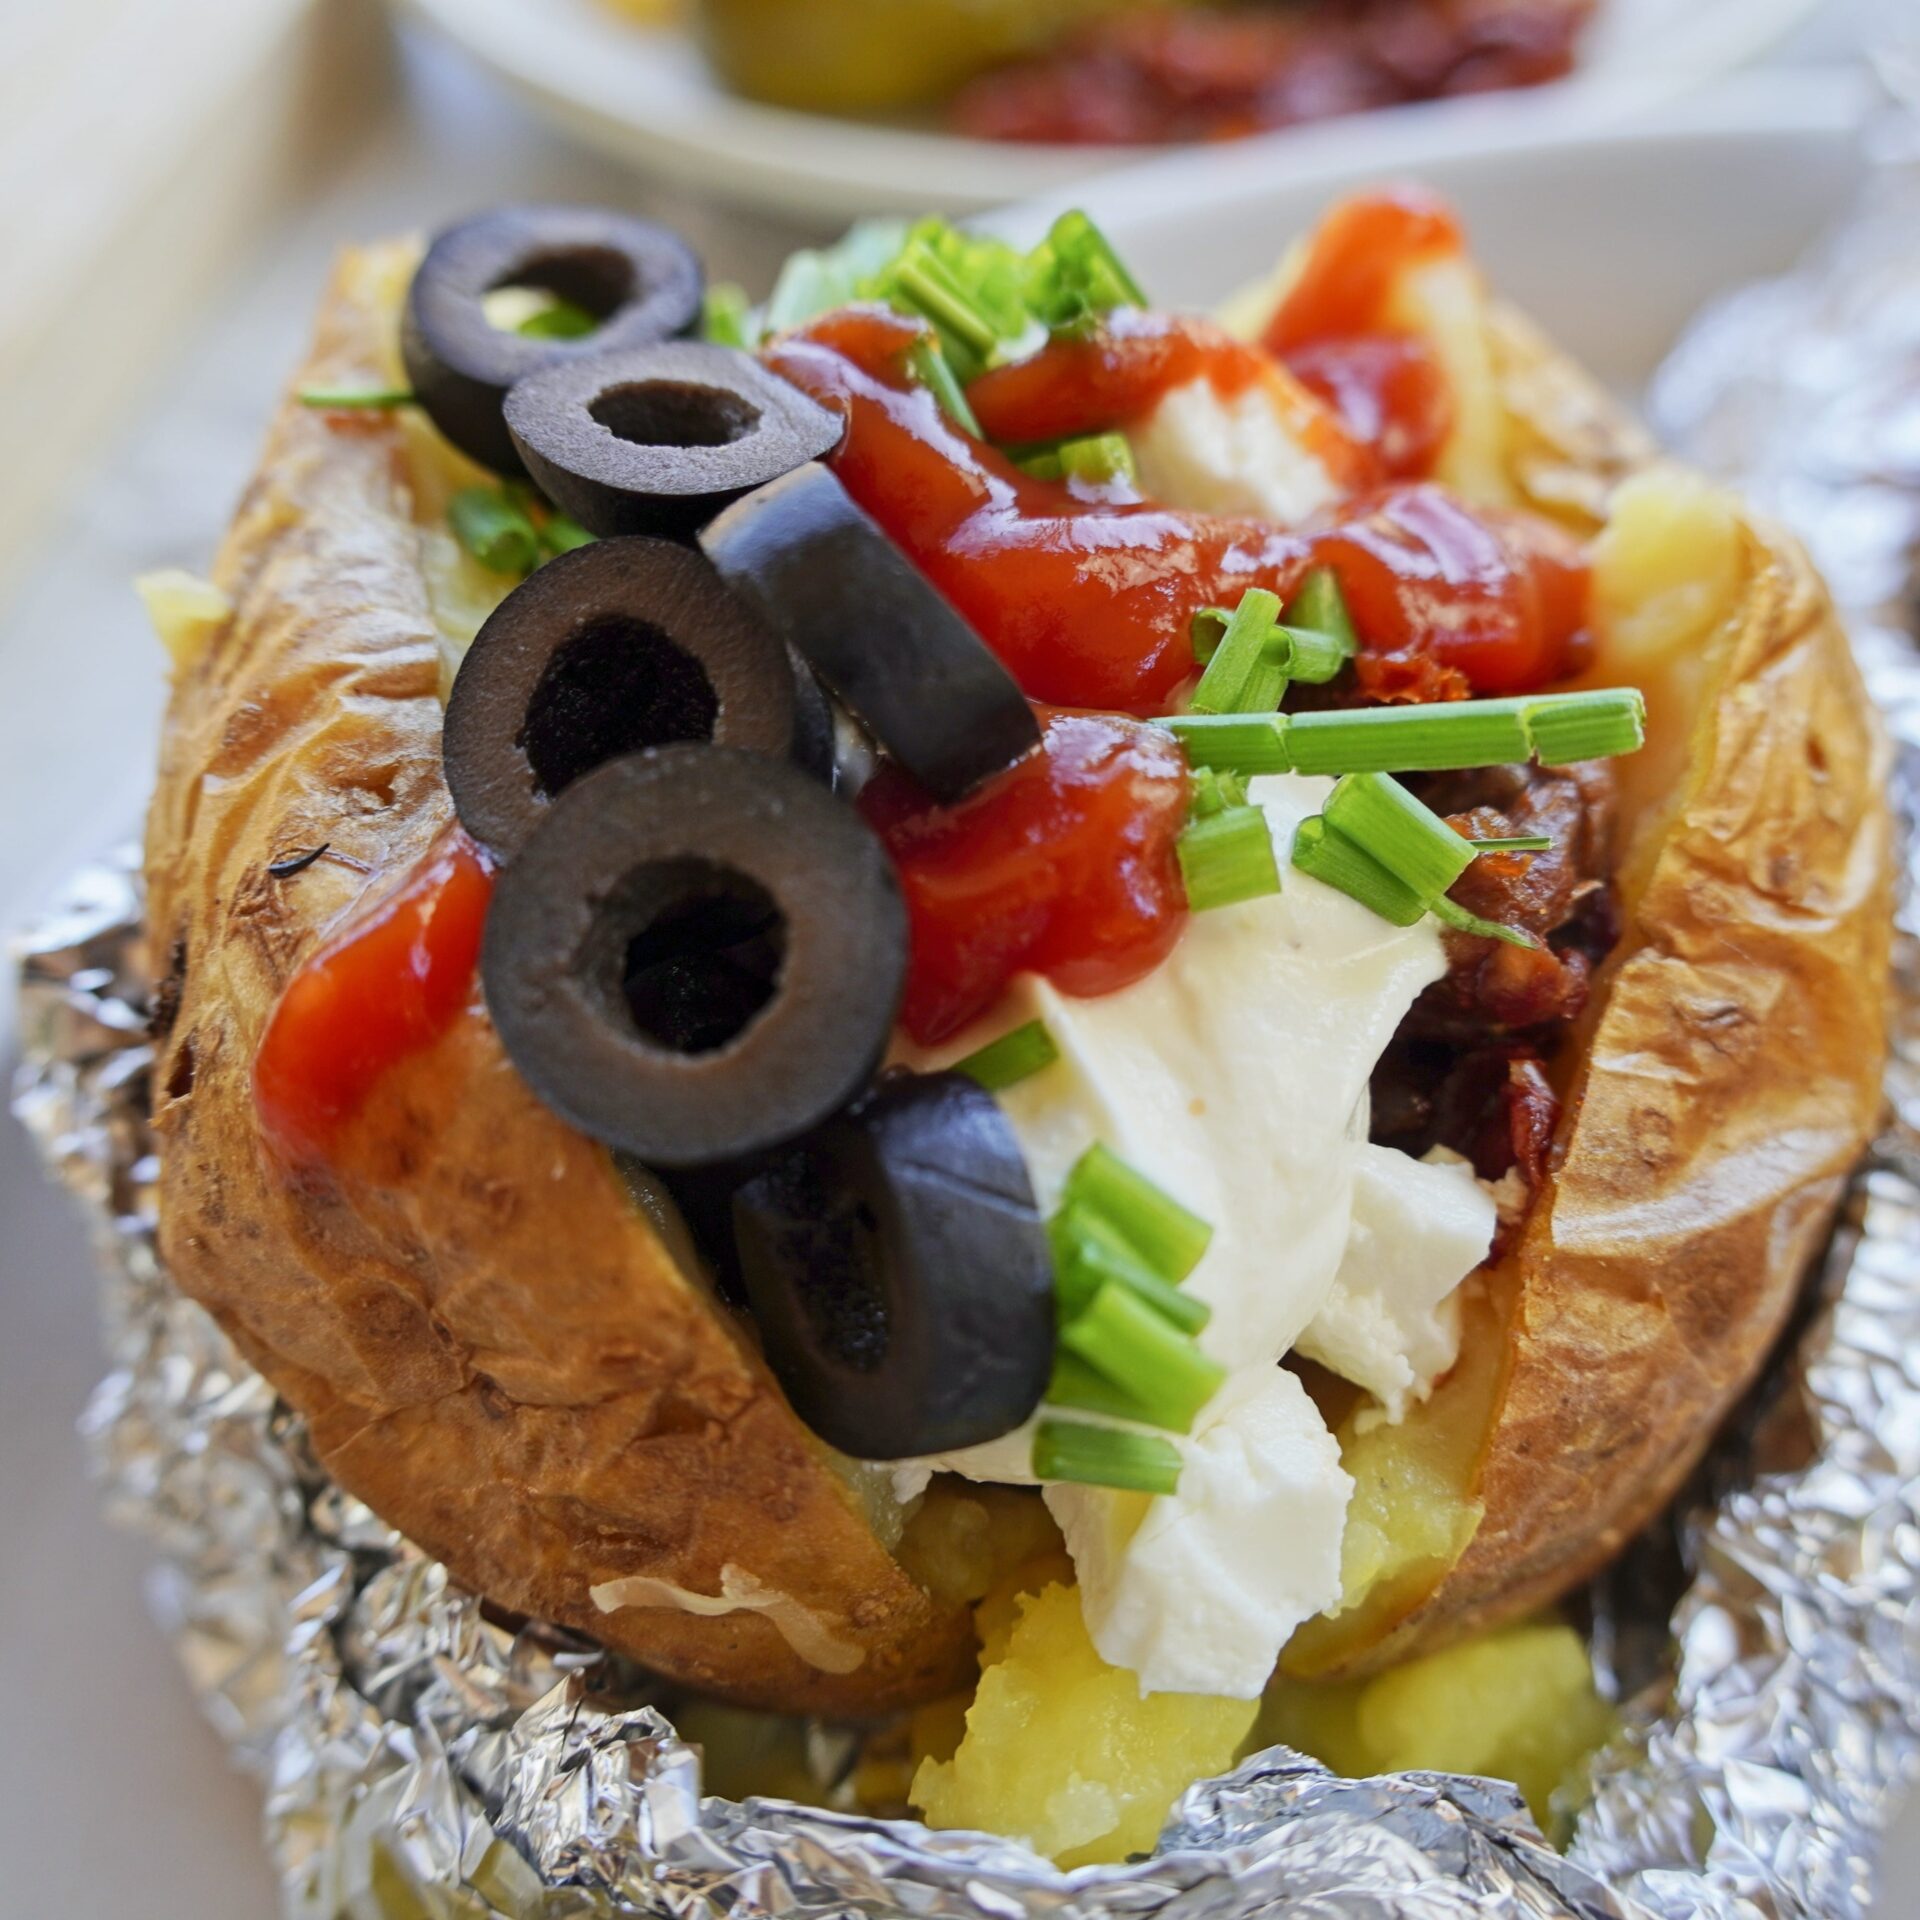
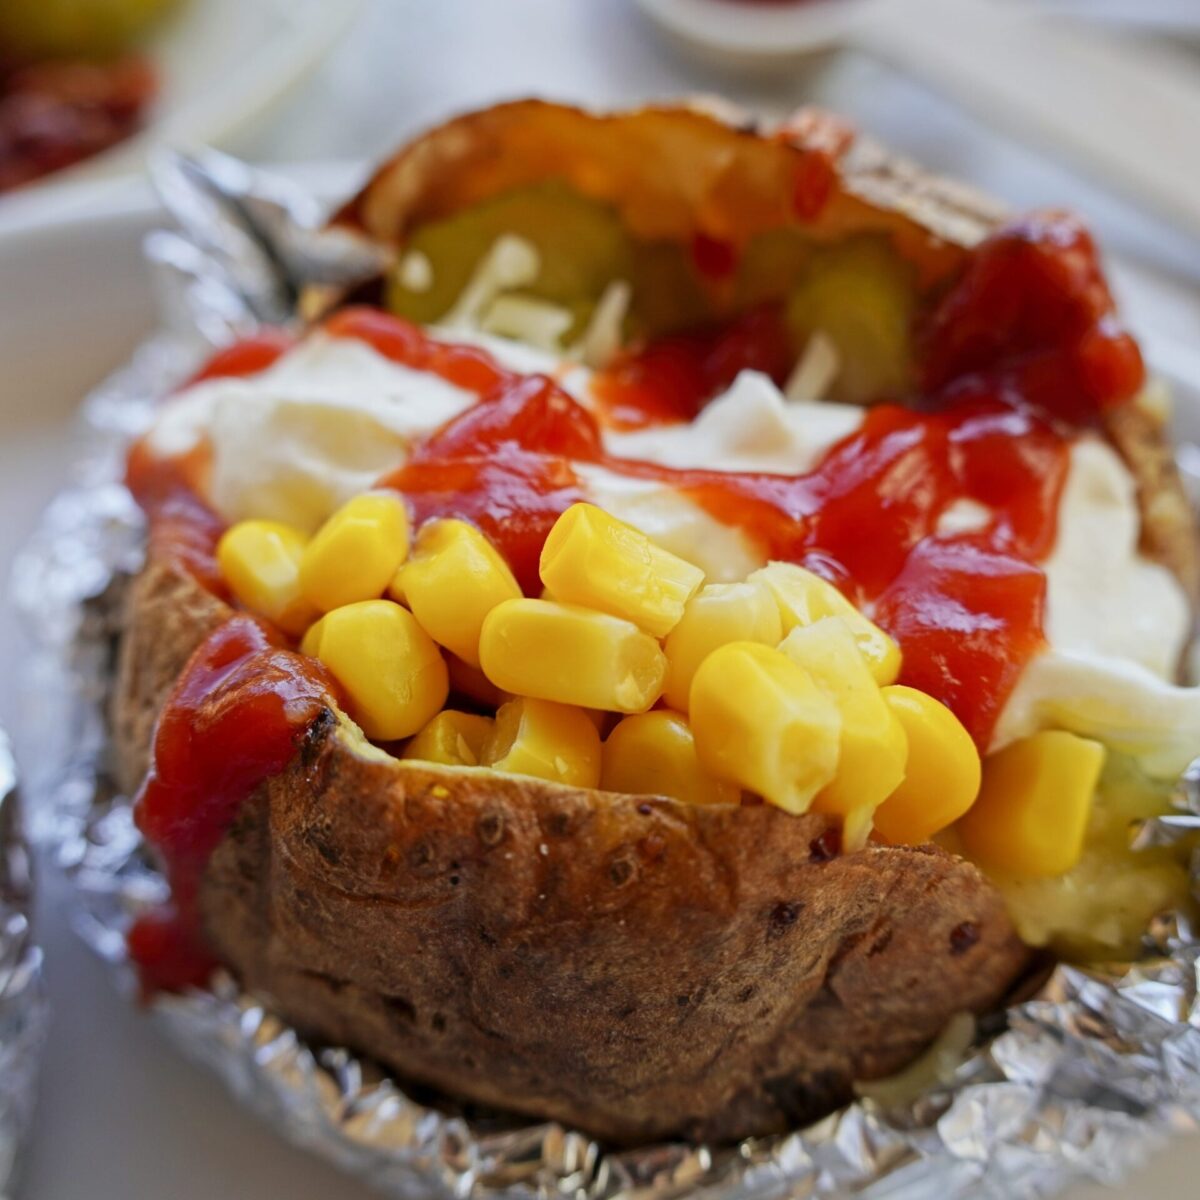
After heating, split open the potato halves. Then, add your favorite sauce and toppings. We enjoy topping ours with sour cream sauce (find the method under our kumpir recipe), ketchup, mayonnaise, or BBQ sauce. Load them up with your favorite fillings. Quick options include olives, pickled vegetables, bulgur or bean salad. The choice is yours. We love adding avocado or guacamole.
Now you know how to store baked potatoes next time you bake a big batch. Enjoy!


How to Freeze for Longer Storage
You can also freeze baked potatoes to keep them longer—up to one month. Check out our guide on how to freeze baked potatoes. You’ll also learn how to thaw and reheat them the right way. Plus, we’ve added tips on how to store potatoes in the freezer so they keep their shape and don’t absorb odors from other foods.
Baked Potatoes & Storage Tips That Worked (and Didn’t)
It all started with our kumpir recipe—delicious Turkish baked potatoes. They are so good, but they take a long time to bake. So we wanted to make a big batch to save time and energy. But then we asked ourselves: how do we store them the best way? That’s when we tested a bunch of methods and found our favorite. Find out which ones kept the potatoes fresh—and which ones flopped.
We Love Turkish Baked Potatoes Called Kumpir!
If you haven’t heard of Kumpir before, let us introduce you to this delicious street food. You can buy it at street food stalls in Turkey. There, they bake the potatoes in special ovens at high temperatures. In one of our previous blog posts, we shared our own kumpir recipe. Check it out—it’s one of our best potato recipes. Super delicious! It’s the perfect dinner or side dish for your next BBQ, a cozy family meal, or a solo treat. And the best thing about it – everyone can adjust their toppings according to their taste!
When you bake kumpir at home, it takes about 1 to 1.5 hours, which is a long time. If you’re only baking four potatoes, it’s not the most time-efficient option. And if you bake a lot, you need to store them properly—because no one likes food waste. That’s why we decided to find the best way to store baked potatoes and reheat them.


Experimenting with Baked Potato Storage: What Worked and What Didn’t
We went through a lot of different ways and methods to store baked potatoes! Here’s what we tried:
- Different types of packaging: We tried aluminum foil, plastic wrap, freezer bags, and even a paper bag. Don’t store baked potatoes in foil—they can get wet. A paper bag doesn’t work either because it doesn’t keep the potatoes fresh. The best option is a Ziploc bag.
- We also experimented with different types of fillings. The best method we found is to store potatoes only with the basic ingredients. It’s cheese and butter. And add other toppings after you reheat the potatoes. Right before you eat them.
- To find the proper storage we tested storing potatoes in the fridge and freezer. We also tried storing in a cool, dark place like our pantry, away from direct sunlight. From our experiments, we found that storing potatoes in cool temperatures or even cold temperatures works best. The fridge is the best option for short-term storage, and the freezer is the best choice for keeping them longer.
- We found out that baked potatoes with fillings last up to 3 days in the fridge. Plain baked potatoes without fillings can last up to 5 days. However, for long-term storage, the freezer is the best option. Check out our preferred method for freezing baked potatoes, too.
After testing all the options, here are some tips and best practices:
- Let the potatoes cool at room temperature before packing them. Use airtight containers to avoid signs of spoilage. The best place to store them is the fridge or freezer. If you baked a lot of potatoes or are doing meal prep, it’s better to freeze them sooner rather than later. Freezing them on the first or second day after baking works best.
- For the best quality, avoid using tin foil or paper bags. Instead, use resealable plastic bags. Ziploc bags work best—you can fit one potato in each bag. That way, each potato is one serving. When you store or freeze them, you can take out exactly as many servings as you need because each potato is packaged individually.
- Don’t store baked potatoes in foil. They can spoil that way.
- The best method is to fill the potatoes with cheese and butter, then freeze them. When you’re ready, just defrost, reheat, and add your favorite toppings.
- The best way to reheat a baked potato is in the oven. When it’s filled with butter and cheese, the inside turns creamy and cheesy, and the skin gets perfectly crispy!
More Delicious Potato Recipes
So you’ve picked up a bunch of fresh potatoes from the store. Now you’re looking for some easy and delicious recipes to try. Give our potato salad a shot—it’s super crunchy and so good. For extra crispiness, cook the potatoes and bake them in the oven. You need a little patience while waiting for the potatoes to cook and bake. But you can chop the vegetables in the meantime. Trust us, the result is worth the wait!
Or try our hash browns. All you need are uncooked potatoes, cheese, and spices. Hash browns are a great choice if you’re craving something crispy but don’t want to spend a lot of time in the kitchen. Just bake them in the oven—pop them in and enjoy your free time while they cook!

The Best Way to Reheat Baked Potatoes & Store Them (Easy!)

Equipment
- 4 Ziploc bags
- 1 container
Ingredients
You only need these ingredients if you’re storing baked potatoes with butter and cheese inside. If you're storing plain baked potatoes, you won’t need them. Want to know how to store plain baked potatoes without filling? Just check the steps below.
- 4 potatoes each weighing 300 g
- 80 g butter
- 80 g mozzarella cheese
- olive oil for greasing
- salt and pepper
Instructions
How to Store Plain Baked Potatoes (Without Filling)?
- Cool the baked potatoes completely at room temperature.
- Remove the foil, then place the baked potatoes in an airtight container and close it tightly.
- Keep the container in the fridge and store the potatoes for up to 5 days.
How to Store Baked Potatoes With Fillings?
- Set your oven to 200°C (390°F) and let it preheat. Take 4 large, long-shaped potatoes, about 300 grams each. Wash them well and dry them completely.
- Use skewers, a fork, or a toothpick to poke holes in the potatoes. Brush them with olive oil.
- Put the potatoes on a rack in the lower part of the oven. Bake at 200°C (390°F) for 60-90 minutes until they are tender. The exact baking time will depend on the size and type of potatoes.
- Take the potatoes out of the oven. Place them in a small dish or make a holder from aluminum foil.* While they are still hot, cut off the top of each potato. Use a fork to gently mash the insides without breaking the skins.
- Add 20 grams of butter to each potato and mix until creamy. Season with salt and pepper. Then, add 20 grams of grated cheese and mix well.
- Join the potato halves together. Cool the potatoes at room temperature.
- Place the potatoes in Ziploc bags. Then put the bags into an airtight container. This helps the potatoes keep their shape and stops them from picking up any odors during storage. Store the container in the fridge.
How to Reheat Baked Potatoes
Oven Method:
- Take the potatoes out of the bags.For potatoes with filling, don’t split the halves.For plain potatoes, don’t cut them.
- Bake on the middle rack of the oven at 180°C (350°F) for 20–30 minutes. You might need a little more or less time depending on your oven and the size of your potatoes.
- Add your favorite sauces and fillings. Check easy and delicious options in our baked potato or kumpir recipe.
Microwave Method:
- Put the baked potato on a plate that's safe for the microwave.
- Set it to full power and heat for 2 to 3 minutes.
- Pause after the first minute to check the temperature—it can vary depending on your microwave.
- Keep in mind: the skin won’t turn crispy in the microwave. For a crispy finish, use the oven instead.
Pan Method:
- Warm up a pan over medium heat.
- Place the baked potato in the pan and cover it with a lid.
- Let it cook for about 5 to 7 minutes, depending on the size.
- Turn the potato once or twice so it heats evenly.
- If you like a little crisp on the outside, leave it uncovered for the last minute or two.
Video
Notes
Have you tried this recipe?
Share the love! Let us know how it turned out! Leave a comment under the recipe or on our YouTube channel.
Frequently Asked Questions
Yes, you can reheat baked potatoes — and there are a few easy ways to do it.
You can use the oven, microwave, or a pan. It really depends on what you’re looking for: speed or crispiness.
What’s the best way to reheat them?
Oven:
Takes longer, but gives you that delicious crispy skin.
Microwave:
It’s the fastest option, but the texture won’t be quite the same as freshly baked.
Pan:
Quick and flavorful — you still get some crispiness, especially on the skin.
Want the step-by-step for each method? Check out our blog post for all the details and tips that actually work!
You can reheat a baked potato easily — just use the oven, microwave, or a pan.
Each method works well, depending on how much time you have and how crispy you want the skin.
In the oven (for crispy skin)
Preheat your oven to 180°C (350°F).
Place the potato right on the oven rack.
Heat for about 20–30 minutes, depending on the size, until it’s hot and the skin is nice and crispy.
In the microwave (quick and easy)
Place the baked potato on a microwave-safe plate.
Heat on full power for 2–3 minutes.
Check after 1 minute to see how it’s warming — every microwave is a little different.
In a pan (great for extra flavor)
Heat a pan over medium heat and place the potato inside.
Cover with a lid and cook for 5 to 7 minutes, depending on the size of the potato, until it’s heated through.
Flip it once or twice to warm it evenly and maybe get a little crisp on the outside!
It depends on what’s in the potato.
Plain baked potatoes last longer than ones with butter or cheese.
Here’s a quick guide:
Plain baked potatoes (no fillings):
You can keep them in the fridge for up to 5 days.
Just let them cool down first, then store them in a container or wrap them up.
Baked potatoes with kumpir filling (like butter and grated cheese):
Eat them within 3 days — the dairy in the filling makes them spoil a little faster.
It’s best not to store baked potatoes in foil.
While baking in foil makes potatoes soft and tender (more like steaming than roasting), foil traps moisture inside. That creates condensation, which can make the potatoes soggy — and in some cases, even unsafe to eat if left at room temperature too long.
What should you do instead?
After baking in foil: Let the potatoes cool down a bit, then remove the foil.
Transfer them to a clean, airtight container and put them in the fridge.
This way, your potato will stay fresh and won’t get too wet or mushy.
To keep baked potatoes warm for up to 2 hours, wrap them in foil while they’re still hot.
This helps hold in the heat and keeps them soft inside.
Here’s how to do it:
Wrap each potato in foil right after baking.
For extra warmth, place them in an airtight container.
This works best with plain baked potatoes that haven’t been salted, stuffed, or topped yet.